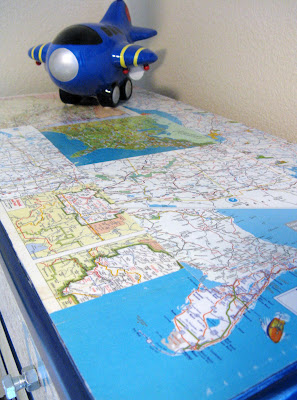
It was a plain wood dresser that we bought cheap a couple years ago. It was painted blue and some new metal knobs were added, nothing to exciting. It was pretty basic.
It also had some chipping paint that wasn't too attractive either. It really was screaming for a makeover! So I gave it a little sanding and some paint fix up, luckily I had leftover paint from the first try!
As I was preparing to decoupage my antique maps onto the dresser my star, Cheri mentioned using a mixture of white glue and water as my decoupage glue! I used 3 parts glue to every 1 part of water, just mix it up and your done. It worked really well and you can't get much cheaper. At back to school time they sell the white glue for around $.10. I just stored the left over in this butter tub to use on my next project!
I cut my maps to size for the drawer fronts and I did a collage of different maps for the top of the dresser. Here I am with my Pampered Chef scraper, my favorite decoupaging tool! LOL After the maps were dry from being glued down I put another couple coats of the decoupage glue over top to seal and protect the maps.
On the side of the dresser I used DecoArt's Chalkboard Paint so my little guy can plan out his journeys. I used a rolling foam paint brush and it worked great, it left the surface really even and smooth! I did a couple coats of this right on the dresser, no priming, and it worked great!
Don't forget to prep your new chalkboard by rubbing chalk all across the surface. Of course after the paint has dried thoroughly!
I made the knobs for the dresser out of nuts and bolts (and a few other goodies) that I got at ReStore and Home Depot. Some of the configurations required some glue to keep them all together, enter Gorilla Glue's Super Glue! I mixed and matched old rusty items with new shinny ones. I LOVE LOVE LOVE how they turned out, so fun!
While all of that dried I wanted to work on the other elements that I had for my little guy's room. I headed to the salvage yard to pick up a few hubcaps.
After I cleaned them up (which was quite an undertaking) and primed them they were ready to be painted red, yellow, and green. The colors of a stop light. DecoArt's patio paint did the trick and like Cheri said, if a snow storm every hits my little guy's room, these hubcaps will hold up nicely! This patio paint is legit!
I love the hubcap stop light and my son has been obsessed with the colors. I never imagined that they would become a learning tool but it seems to be a nice side effect!
Once everything was dry, I assembled everything and put it in it's place. Here is the dresser in all it's map glory and hardware glory!
A look at the cool knobs and a close up of the maps. I guess if we ever lose our GPS we can just grab the dresser!
My kids are thrilled with the chalkboard on the side! We get to write on the furniture? WHAT?
The top of the dresser turned out fantastic too, I love looking at the maps trying to figure out what states and areas are on there, since I just kind of cut and glued without looking what was going up there.
This is the whole set up.
Above the dresser I hung some of our old license plates, I'm sure we'll have a pretty good collection by the time we are done with our journey in the military! I hung a shop light in the corner as a pendant light. It is so super cute....for a shop light!
So there you have it! An awesome automobile room for my little guy! Something that can grow with him for years to come.
So there you have it! I think it all turned out pretty awesome and my son seems to love it too! Phew that was a long post! Well now I think I will go catch up on the things that have been neglected in the name of competition; the house needs a good clean, food needs to be bought, and my nails could use a good manicure (and a pedicure while were at it)!!! Thanks everyone for your support once again!
Linking up to these great link parties!


No comments:
Post a Comment