Tuesday, August 23, 2011

New Discount Fashion Website

You need to check out this discount fashion website that I've come across...it's called Style Find.  Check out the website by clicking HERE. You'd be amazed by all the fabulous find that you can find.  With over 200+ fashion brands, thousands of editor's picks to shop and incredible deals on the hottest designer styles, StyleFind is shopping made simple. The editor's scour the internet to find the perfect pieces for you, and when you register to become a member of StyleFind (it's FREE!) you will receive exclusive access to unbelievable designer deals!  I came across this site by being a BzzAgent.  Interested in learning more about this site and being a BzzAgent, follow this link by clicking HERE  You won't be disappointed!


ENJOY!


Wednesday, July 13, 2011

NEW 2011 Fall Line is Out


I have VERY exciting news!  The new Stella & Dot Fall Line is now available!  There's so much to choose from.  Here are a few pics of these new fabulous jewels:


AND my absolute favorite!


Check out my website to see the rest of the New 2011 Fall Line at:  www.stelladot.com/tammyshannon

AND/OR

Contact me directly to find out what kind of deals I'm offering to celebrate the release of the new Fall Line at:  tamshan@yahoo.ca


I look forward to hearing from you!

Tammy

Wednesday, June 22, 2011

Cheese Unbrella

I found this on the site referred to below.  This was too adoreable not to share!

To make these interesting finger food for your party, all you need are Babybal cheeses and straws.


Isn't it the easiest party appetizer idea? It's also a fun and healthy item to pack into your kid's lunch box!

Tuesday, May 31, 2011

Saucy coconut shrimp


Saucy coconut shrimp
  • Prep Time : 10 min
  • Cooking time : 10 min
  • Makes : 2 servings, 1/2 recipe (178 g) each

What You Need!

  • 1 tsp. oil
  • 1/2 lb. (225 g) uncooked deveined peeled medium shrimp
  • 2 cloves garlic, minced
  • 1 tsp. crushed red pepper
  • 1/4 cup canned light coconut milk
  • 3 Tbsp. Kraft Crunchy Peanut Butter
  • 3 Tbsp. lime juice
  • 2 tsp. lite soy sauce
  • 1/4 cup thin mango slices

Make It!

  1. Heat oil in medium skillet on medium-high heat. Add shrimp; cook 1 min. Stir in garlic and crushed pepper; cook and stir 1 to 2 min. or until shrimp turn pink. Transfer to bowl; cover to keep warm.
  2. Add all remaining ingredients except mangos to skillet; cook on low heat 3 to 4 min. or until peanut butter is melted and sauce is well blended, stirring frequently. (Do not bring to boil.)
  3. Stir in shrimp and mangos; cook 2 to 3 min. or until heated through, stirring frequently.

Chocolate Cookie Ice Cream Slice


Chocolate Cookie Ice Cream Slice
5 cups chocolate ice cream, slightly softened
14 Chips Ahoy! Cookies, crushed (about 1-1/4 cups)
1/4 cup non-hydrogenated margarine, melted
1-1/2 cups thawed Cool Whip Light Whipped Topping
1 square Baker's Semi-Sweet Chocolate

Make It


LINE 9x5-inch loaf pan with foil, with ends of foil extending over sides. Spread ice cream onto bottom of pan. Mix cookie crumbs and margarine; sprinkle over ice cream. Cover with ends of foil; gently press crumb mixture into ice cream.

FREEZE 6 hours or until firm.

INVERT dessert onto plate when ready to serve; remove pan and foil. Frost dessert with Cool Whip. Coarsely grate chocolate square; sprinkle over dessert.    

Mint Chip Ice Cream Pie

Mint Chip Ice Cream Pie
 
Serves 8| Hands-On Time: 10m | Total Time: 2hr 25m

Ingredients

Directions

  1. In a large bowl, combine the chocolate and cereal until the cereal is completely coated. Transfer to a 9-inch springform pan. Press the mixture into the bottom and 1 inch up the sides of the pan. Freeze just until firm, 5 to 10 minutes.
  2. Spread the ice cream in the prepared crust and freeze, covered, until firm, for at least 2 hours and up to 3 days.

Ribbon Lanterns

Martha Stewart Living, July 2007http://www.marthastewart.com/268402/ribbon-lanterns
3.525

Easy Ice Cream Cake

Easy Ice Cream CakeMarcus Nilsson
Serves 6 to 8
Hands-on Time: 10m
Total Time: 1hr 10m
Ingredients
  • 1 cup heavy cream
  • 2 tablespoons confectioners' sugar
  • 6 ice cream sandwiches (3.5 ounces each)
  • 1/2 cup chocolate chips, chopped
Directions

1. Line an 8½-by-4½-inch loaf pan with a piece of wax paper or parchment, allowing the paper to hang over both long sides.

2. In a large bowl, beat the cream and sugar until stiff peaks form.

3. In the bottom of the pan, arrange 3 of the sandwiches in a single layer, cutting them to fit as necessary. Spread with half the whipped cream. Repeat with the remaining sandwiches and whipped cream.

4. Sprinkle the top of the cake with the chopped chocolate chips. Cover with plastic wrap and freeze until firm, at least 1 hour and up to 1 week.

5. Holding both sides of the paper overhang, lift the cake out of the pan and transfer to a platter. Discard the paper and serve.

Tip
Upgrade this kid-friendly treat with chopped candy bars in place of the chocolate chips. Try 2 bars of Heath, Snickers, Butterfinger, or Nestlé Crunch.

Nutritional Information
Calories 440; Calories From Fat 53%; Fat 26g; Sat Fat 15g; Cholesterol 64mg; Sodium 155mg; Protein 6g; Carbohydrate 47g; Fiber 2g; Sugar 31g

Tuesday, May 17, 2011

Celebrate: Lolipop Centerpiece

Candy Buffets are all the rage. In fact, they have become a bit of a Cabrera Celebration favorite. For my sister’s wedding, I created this fun centerpiece. Super easy, and great for any occasion.

To create one of your own just follow some of these simple tips.
  1. Use floral foam at the bottom of your container to hold the candies.
  2. A little hot glue at the bottom of each stick before you stick it through the foam will help secure the pops.
  3. Gumballs and jellybeans make a great filler to cover the foam. I glued the gumballs in place and just poured in the jellybeans into the center.
Here is how it looked on the table, fun and simple!

basket weave vases

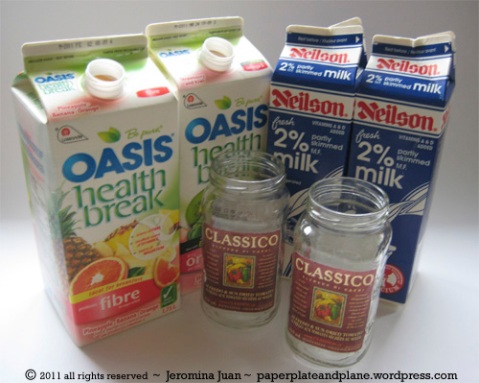
Salvaged some cartons and jars from being thrown into the landfill and woven the cartons into this pair of bright vases.


I made them in theme of the beautiful colors of our globe: the warp and weft are in cool blue and vivid green hues, and the vases are topped off with beautiful white clouds of hydrangeas. Just the kind of décor my kitchen table needs this spring!


For each vase, you will need two milk or juice cartons of the same size and a jar, some paint and a hot glue gun.


1. Cut the cartons to preferred height, making sure that they are taller than the jar for containing the water for your bouquet. Paint the cartons. If you want your vases to be a single color, you may skip this step for now and paint after the cartons are woven.

2. For each vase: cut one carton into 1/2″ strips vertically, making sure not to cut out the bottom, and cut the second carton into 1/2″ strips horizontally.

3. Start weaving by sliding the horizontal strips into alternating vertical strips.

4. Continue weaving until you reach the top and glue the top pieces together so the basket weave does not come undone.

5. Fill your jar with water and place inside the woven carton and arrange your favorite spring blooms.

Winnie the Pooh Invitations

 
I actually had another uber cute, 3-D invitation idea, but these little guys are being mailed far and wide, and these bottles seemed sturdier. I'm using the other packaging idea for the favors.
The invites are always the first peek into how an event is going to be, and I want people to want to come just to see what will follow the invitations!

I found the jars on this website. They are only 50 cents for the bottle and the cap. The shipping was as much as the bottles, so they ended up being a dollar each. It's not a bad price, and it was the best I could find when shipping/bottles were combined.

I 'lifted' some clip art using google imaging, and added these to address labels. I'll add the guest addresses to the labels. I put my return address on a small sticker on top (I blotched out the addresses, not because *you* aren't totally on the guest list, but.....)
The jars have a smooth belly, and a smooth back. I'm going to place the mailing stamps on the back. (2 regular priced stamps, I'm going to see if I can find one that sort of kind of goes with my theme, and I'll share the final invites pre-mailing in a few months).
For the innards, I bought this bee punch for 'confetti' from Michael's, it's Martha Stewart...in my head, she'd approve. I printed off a simple invitation with info from the front using a 'food quote from Pooh.'
"It's more fun to talk with people who doesn't use difficult words, but rather short easy words like How about Lunch?"
 
On the back, I found a bunch of sweet quotes from pooh, and a little square with a bee. I inked both of the edges, and then glued them down to a larger sheet of brown paper (5x7). You can click to read those, but they will be on a lot of other shower related things in the the future as well.
I added a little hive I cut out free hand, and a bee from a stamp with a little buzz I dotted onto the back.
I rolled it up, tied it up with some ribbon from Hobby Lobby, and slipped them inside the bears with the bee confetti.

teddy bear cookies

Need a fun rainy day project for the kids? Here’s some black and white teddies from Land O’Lakes. Just roll up all the sizes of balls from the dough, stick them together and you’ve got cute little teddy bears! Fun lunchbox treat, too!

Teddy Bear Cookies
  • 1 cup sugar
  • 3/4 cup Land O Lakes® Butter, softened
  • 1 Land O Lakes® All-Natural Egg
  • 2 teaspoons vanilla
  • 2 1/4 cups all-purpose flour
  • 1 teaspoon baking powder
  • 1/4 teaspoon salt
  • 2 (1-ounce) squares unsweetened baking chocolate, melted
Heat oven to 375°F. Combine sugar, butter, egg and vanilla in large bowl. Beat at medium speed, scraping bowl often, until well mixed. Reduce speed to low; add flour, baking powder and salt. Beat, scraping bowl often, until well mixed.

Divide dough in half. Place half of dough into medium bowl; stir in chocolate until well mixed.
For each teddy bear, use either vanilla or chocolate dough or a combination for two-toned teddy bears.

Shape 1 large (1-inch) ball for body.

Place onto ungreased cookie sheet; flatten slightly. Shape 1 medium (3/4-inch) ball for head, 4 small (1/2-inch) balls for arms and legs, 2 smaller balls for ears. Attach head, arms, legs and ears by overlapping slightly onto body. Add additional small balls for eyes, nose and mouth, if desired. Use fork to make claws on paws.

Bake for 7 to 8 minutes or until body is set. Cool 1 minute on cookie sheet; remove to cooling rack.

Cool completely.